Image Generation APIs
Go from prompt to deployed image generation feature in under 3 hours using Replicate and Flux.
What you'll learn
The Replicate API Pattern
In Module 13, you learned how diffusion models generate images. Now you will learn to call them from TypeScript. The Replicate platform hosts open-source models — including the Flux family — behind a unified API. You send a prompt, you get an image URL back. The integration pattern is the same regardless of which model you choose.
Creating a prediction: model ID + input object
Every Replicate API call follows the same shape: specify a model identifier and an input object. The model identifier is a string like "black-forest-labs/flux-schnell". The input object varies by model but always includes a prompt field.
import Replicate from "replicate";
const replicate = new Replicate({
auth: process.env.REPLICATE_API_TOKEN,
});
// The simplest possible image generation call
const output = await replicate.run(
"black-forest-labs/flux-schnell",
{
input: {
prompt: "A modern office workspace with dual monitors showing code, warm desk lamp lighting, photorealistic",
num_outputs: 1,
aspect_ratio: "16:9",
output_format: "webp",
output_quality: 80,
},
}
);
// output is an array of URLs (or ReadableStreams)
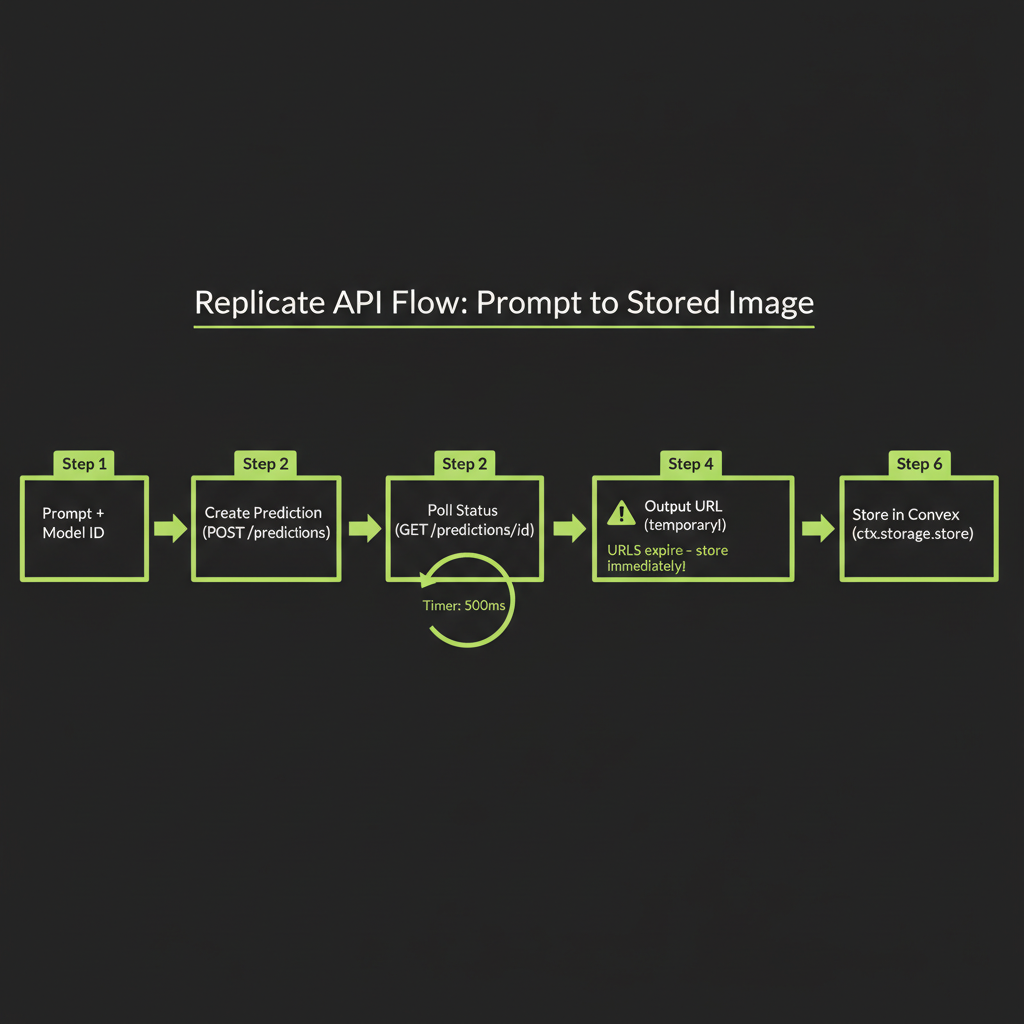
const imageUrl = output[0] as string;The replicate.run() method is the synchronous wrapper — it creates a prediction, polls until completion, and returns the output. For most use cases, this is what you want. Under the hood, it is making HTTP requests to Replicate's prediction API and waiting for the succeeded status.
Async prediction handling: poll vs webhook vs streaming
For production applications where you need more control, Replicate supports three completion patterns:
- Polling (default):
replicate.run()handles this automatically. It creates a prediction, then polls the status endpoint every few hundred milliseconds until the prediction completes or fails. - Webhooks: Pass a
webhookURL when creating a prediction. Replicate will POST the result to your endpoint when the image is ready. This is better for serverless environments where you do not want to hold a connection open. - Streaming: Some models support streaming output via
replicate.stream(). For image generation, this is less common — images are typically returned as a single output, not streamed progressively.
// Webhook pattern for serverless environments
const prediction = await replicate.predictions.create({
  model: "black-forest-labs/flux-schnell",
  input: {
    prompt: "A serene mountain lake at dawn, mist rising, ultra-wide landscape",
  },
  webhook: "https://your-app.com/api/replicate-webhook",
  webhook_events_filter: ["completed"],
});

// prediction.id can be stored to track status
console.log("Prediction started:", prediction.id);
Output: URL to generated image (temporary — store immediately)
When a prediction completes, you get back a URL pointing to the generated image hosted on Replicate's servers. This URL is temporary — it expires after a short period (typically hours, not days). You must download and store the image before the URL expires.
Replicate output URLs expire. If you display the URL directly in your UI without storing the image, your users will see broken images within hours. Always download the image and persist it in your own storage (Convex file storage, S3, etc.) immediately after generation.
Error handling: model failures, content policy rejections, timeouts
Image generation can fail for several reasons, and your code needs to handle each gracefully:
- Content policy rejection: The model or Replicate's safety layer blocks prompts that violate content policies. You will receive a
failedstatus with an error message. Surface a user-friendly message rather than the raw error. - Model timeout: Complex prompts or high-demand periods can cause predictions to exceed the timeout. Implement retry logic with exponential backoff.
- Rate limiting: Replicate enforces rate limits based on your plan. Handle 429 responses by queuing requests.
- Invalid parameters: Passing unsupported aspect ratios, output formats, or values outside the model's accepted range will fail immediately.
async function generateImageSafe(prompt: string): Promise<string | null> {
  try {
    const output = await replicate.run(
      "black-forest-labs/flux-schnell",
      {
        input: {
          prompt,
          num_outputs: 1,
          output_format: "webp",
        },
      }
    );
    return output[0] as string;
  } catch (error: unknown) {
    if (error instanceof Error) {
      if (error.message.includes("content policy")) {
        console.error("Content policy violation:", prompt);
        return null;
      }
      if (error.message.includes("rate limit")) {
        // Wait and retry
        await new Promise((r) => setTimeout(r, 5000));
        return generateImageSafe(prompt);
      }
    }
    throw error;
  }
}
The Flux Model Family
Flux is a family of image generation models from Black Forest Labs, the team behind Stable Diffusion. Built on the DiT (Diffusion Transformer) architecture with rectified flow, Flux models produce high-quality images with fast generation times. The family has three tiers, each optimized for a different use case.
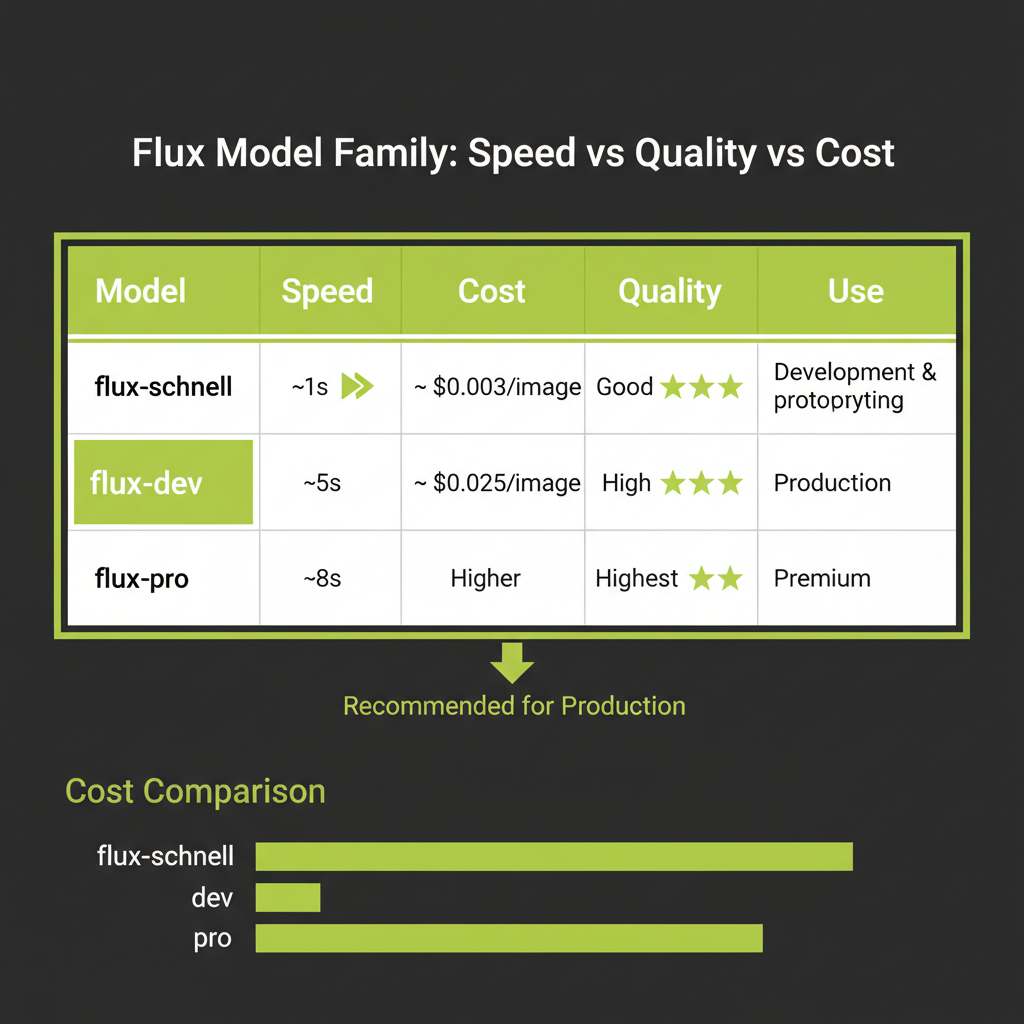
flux-schnell: ~$0.003/image, ~1 second — for development and prototyping
Schnell (German for "fast") is the speed-optimized variant. It uses just 1–4 denoising steps thanks to aggressive distillation and rectified flow. At roughly $0.003 per image and under a second of generation time, it is ideal for rapid iteration during development.
The quality is good but not great — fine details like hands, text in images, and complex compositions may show artifacts. But when you are testing prompt structures, iterating on UI layouts, or generating dozens of variations to find the right direction, schnell is the right choice. You should never prototype with expensive models.
flux-dev: ~$0.025/image, ~5 seconds — for production quality
Dev is the balanced variant. It runs more denoising steps, producing noticeably sharper and more coherent images. The ~$0.025 per image cost is still very affordable for production features, and the 5-second generation time is acceptable for most user-facing applications with appropriate loading states.
Flux-dev is guidance-distilled, meaning it does not require classifier-free guidance (CFG) at inference time. This simplifies the API call — you do not need to specify a guidance scale parameter. The model already incorporates prompt adherence into its weights.
flux-pro: higher quality, higher cost — for premium use cases
Pro is the highest quality variant, available only through API (not open-weight). It produces the best results for challenging compositions, photorealistic scenes, and detailed artistic styles. The cost is approximately $0.04–0.05 per image. Use it when the final output quality justifies the cost — marketing assets, client-facing content, portfolio pieces.
Start with flux-schnell (~$0.003/image, ~1s) for development. Switch to flux-dev for production. Never prototype with expensive models. This single habit will save you hundreds of dollars during development — a team generating 500 test images with flux-dev would spend $12.50, while the same 500 images with schnell costs $1.50.
Model Comparison
Replicate Flux vs OpenAI DALL-E 3
When choosing an image generation API for a TypeScript application, Flux and DALL-E 3 are the two primary options. They differ in several important dimensions:
- Quality: Both produce high-quality images. Flux excels at photorealistic and artistic styles. DALL-E 3 excels at illustrations, diagrams, and text rendering within images.
- Cost: Flux-schnell is 10–20x cheaper per image than DALL-E 3 standard ($0.003 vs $0.04–0.08). For high-volume applications, this difference compounds quickly.
- API design: Replicate uses a prediction model (create, poll, retrieve). OpenAI uses a simpler synchronous call via their
/images/generationsendpoint. Both are straightforward in TypeScript. - Content policy: DALL-E 3 has stricter content filtering. Flux (especially when self-hosted) offers more flexibility. For production applications that need tight content control, DALL-E 3's guardrails can be an advantage.
- Prompt rewriting: DALL-E 3 automatically rewrites your prompt to improve results, which can be surprising. Flux uses your prompt exactly as given, offering more predictable control.
Stable Diffusion variants: open-source options on Replicate
Replicate also hosts Stable Diffusion models (SDXL, SD 3.5) that you can use with the same API pattern. These are good alternatives when you need a different aesthetic or want to use a model you can also run locally for development. The API call structure is identical — only the model ID and input parameters change.
Decision framework
Use Flux when you need photorealistic images, artistic styles, fast iteration, or cost-sensitive high-volume generation. Use DALL-E 3 when you need illustrations, text in images, strong content safety guarantees, or are already deeply integrated with the OpenAI ecosystem. For most AI engineering projects in TypeScript, Flux via Replicate is the recommended default.
Image Prompt Engineering
Writing effective image prompts is a skill distinct from writing LLM text prompts. Text prompts are about precision and structure. Image prompts are about visual description — painting a picture in words that the diffusion model can interpret.
The six elements of an effective image prompt
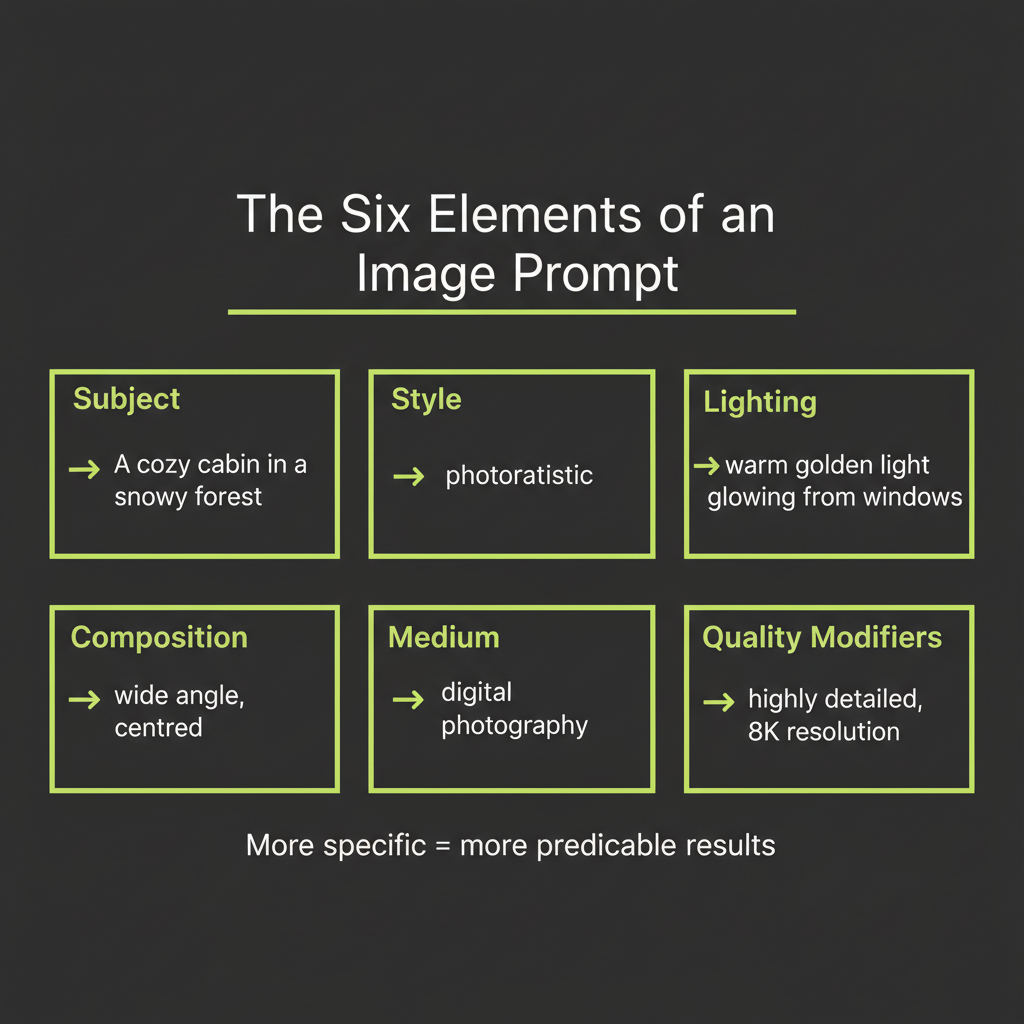
Every strong image prompt includes some combination of these six elements. You do not need all six in every prompt, but the more specific you are, the more control you have over the output:
- Subject: What is in the image? Be specific. "A golden retriever puppy" is better than "a dog." "A 1960s Volkswagen Beetle in mint green" is better than "a car."
- Style: What artistic style? Photorealistic, watercolor, oil painting, anime, isometric 3D, vector art, pencil sketch. The style word dramatically changes the output.
- Lighting: What type of light? Golden hour, studio lighting, dramatic chiaroscuro, soft diffused light, neon glow, backlit silhouette. Lighting sets the mood.
- Composition: How is the scene framed? Close-up portrait, wide landscape, bird's-eye view, Dutch angle, centered symmetrical, rule of thirds. This controls the camera perspective.
- Medium: What does it look like it was made with? 35mm film photography, digital illustration, charcoal on paper, Unreal Engine render, DSLR macro lens. The medium adds texture and authenticity.
- Quality modifiers: What level of detail and quality? "Highly detailed," "8K resolution," "award-winning photography," "museum quality." These push the model toward higher fidelity output.
Here is an example that uses all six elements:
Subject:     A cozy cabin in a snowy forest
Style:       Photorealistic
Lighting:    Warm light glowing from windows, twilight sky
Composition: Wide shot, cabin centered, forest framing
Medium:      DSLR photography, 35mm lens
Quality:     Highly detailed, 8K

Combined prompt:
"A cozy log cabin in a snowy pine forest, warm golden light
glowing from windows against a twilight sky, wide shot with
the cabin centered and tall pines framing the scene,
photorealistic DSLR photography with 35mm lens, highly
detailed, 8K resolution"
Negative prompts: what to exclude
Some models support negative prompts — a separate field that tells the model what to avoid. Common negative prompt entries include "blurry," "low quality," "distorted hands," "text," and "watermark." Flux does not natively support negative prompts in the same way as Stable Diffusion, but you can often achieve similar results by being specific about what you want rather than what you do not want.
Style references: photography terms, art movements, medium descriptors
The more specific your vocabulary, the more control you have. Here are reference terms by category:
- Photography: bokeh, depth of field, macro, long exposure, tilt-shift, HDR, film grain, Kodak Portra 400
- Art movements: Art Nouveau, Bauhaus, Impressionist, Cyberpunk, Solarpunk, Vaporwave, Brutalist
- Digital art: concept art, matte painting, digital illustration, 3D render, low poly, pixel art
- Traditional media: oil on canvas, watercolor wash, charcoal sketch, ink drawing, gouache, linocut print
The iteration pattern: generate, inspect, refine, generate
Effective image prompt engineering is iterative. You rarely get the perfect image on the first attempt. The pattern is:
- Generate with your initial prompt using schnell (fast, cheap).
- Inspect the output. What matches your intent? What is missing?
- Refine the prompt. Add specificity where the image fell short. Remove elements that produced unwanted results.
- Generate again. Compare with the previous version.
This loop is manual for now — in Module 15, you will automate it using Claude Vision to analyze images and suggest prompt refinements programmatically.
Model selection is the primary cost lever for image generation. Using flux-schnell during development and flux-dev in production is not just a convenience — it is a cost-management strategy. For applications generating thousands of images, consider implementing a caching layer that stores previously generated images and returns them for identical or near-identical prompts.
Storing and Serving Generated Images
Why you must store immediately: Replicate output URLs expire
When Replicate returns an image URL, that URL points to temporary storage on Replicate's CDN. Within hours, the URL will return a 404. Your application must treat the generation output as ephemeral and persist the image in your own storage layer immediately after generation.
Convex file storage pattern
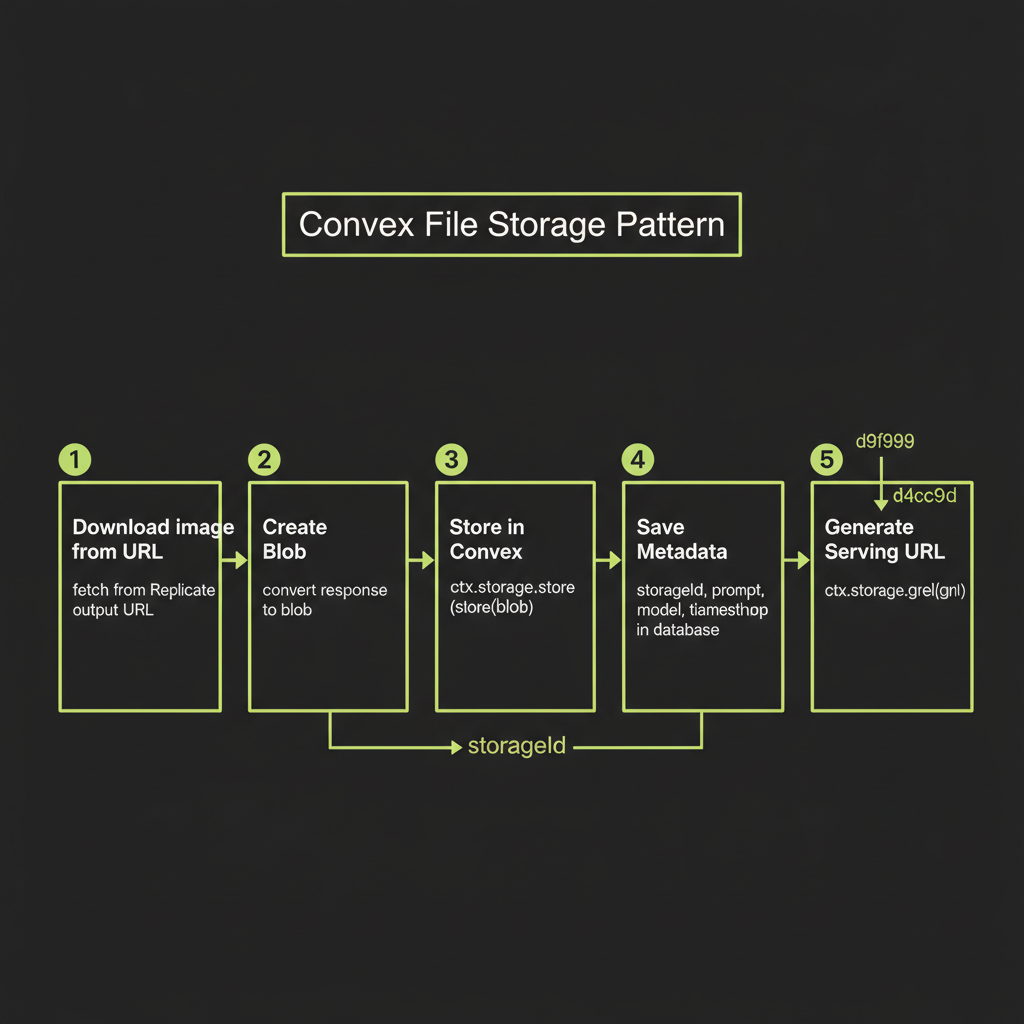
Convex provides built-in file storage that handles uploads, storage, and signed URL generation. The pattern is: download the image as a blob, store it via ctx.storage.store(), save the returned storage ID in your database alongside metadata, and retrieve serving URLs via ctx.storage.getUrl().
// convex/images.ts
import { action, internalMutation } from "./_generated/server";
import { internal } from "./_generated/api";
import { v } from "convex/values";
import Replicate from "replicate";

export const generateAndStore = action({
  args: {
    prompt: v.string(),
    model: v.optional(v.string()),
  },
  handler: async (ctx, args) => {
    const replicate = new Replicate();
    const modelId = args.model ?? "black-forest-labs/flux-schnell";

    // 1. Generate image via Replicate
    const output = await replicate.run(modelId, {
      input: {
        prompt: args.prompt,
        num_outputs: 1,
        output_format: "webp",
        output_quality: 80,
      },
    });
    const imageUrl = output[0] as string;

    // 2. Download the image before the URL expires
    const response = await fetch(imageUrl);
    const blob = await response.blob();

    // 3. Store in Convex file storage
    const storageId = await ctx.storage.store(blob);

    // 4. Save metadata in the database
    await ctx.runMutation(internal.images.saveMetadata, {
      storageId,
      prompt: args.prompt,
      model: modelId,
    });

    return storageId;
  },
});

export const saveMetadata = internalMutation({
  args: {
    storageId: v.id("_storage"),
    prompt: v.string(),
    model: v.string(),
  },
  handler: async (ctx, args) => {
    await ctx.db.insert("images", {
      storageId: args.storageId,
      prompt: args.prompt,
      model: args.model,
      createdAt: Date.now(),
    });
  },
});
Signed URLs for serving in React UI
To display stored images in your React frontend, query for the storage ID and convert it to a serving URL:
// convex/images.ts
import { query } from "./_generated/server";
import { v } from "convex/values";

export const list = query({
  handler: async (ctx) => {
    const images = await ctx.db.query("images").order("desc").take(20);
    return Promise.all(
      images.map(async (image) => ({
        ...image,
        url: await ctx.storage.getUrl(image.storageId),
      }))
    );
  },
});
In your React component, use the Convex useQuery hook to reactively display images as they are generated:
// src/components/ImageGallery.tsx
import { useQuery } from "convex/react";
import { api } from "../../convex/_generated/api";

export function ImageGallery() {
  const images = useQuery(api.images.list);

  return (
    <div className="grid grid-cols-2 gap-4">
      {images?.map((image) => (
        <div key={image._id} className="relative">
          <img
            src={image.url ?? ""}
            alt={image.prompt}
            className="rounded-lg w-full"
          />
          <p className="text-sm text-gray-400 mt-2">
            {image.prompt}
          </p>
        </div>
      ))}
    </div>
  );
}
Build Project — Image Generation Feature
Now put it all together. Your build project for this module is an image generation feature with a React UI, Convex backend, and model comparison capability.
Architecture overview
The feature has three components:
- Convex action: Accepts a prompt and model selection, calls Replicate, stores the result in Convex file storage, and saves metadata.
- React UI: A prompt input field, a model selector (schnell vs dev), a "Generate" button, and a gallery of generated images with their prompts displayed.
- Comparison mode: A toggle that generates the same prompt with both schnell and dev side-by-side, so you can directly compare quality, speed, and cost.
Convex schema
// convex/schema.ts
import { defineSchema, defineTable } from "convex/server";
import { v } from "convex/values";

export default defineSchema({
  images: defineTable({
    storageId: v.id("_storage"),
    prompt: v.string(),
    model: v.string(),
    comparisonGroup: v.optional(v.string()),
    generationTimeMs: v.optional(v.number()),
    createdAt: v.number(),
  }).index("by_comparison", ["comparisonGroup"]),
});
React UI: prompt input, model selector, generation display
The UI should include a text area for the prompt, a dropdown to select between flux-schnell and flux-dev, a generate button with loading state, and a grid displaying generated images. For the comparison mode, generate both models simultaneously and display results side-by-side with timing and cost labels.
Add a visible cost counter to your UI during development. Display the running total of generation costs (schnell count x $0.003 + dev count x $0.025) so you build cost awareness into your workflow from the start.
Generate the same prompt with flux-schnell and flux-dev. Compare quality, generation time, and cost. This exercise builds your intuition for when each model is appropriate.
- Choose a detailed prompt using the six-element structure — for example: "A professional product photo of a ceramic coffee mug on a marble surface, studio lighting with soft shadows, close-up composition, photorealistic, DSLR quality"
- Generate with flux-schnell. Record the generation time (use
Date.now()before and after the API call). Note the cost (~$0.003). - Generate with flux-dev using the identical prompt. Record timing and cost (~$0.025).
- Compare the outputs. Look specifically at: fine detail (textures, edges), prompt adherence (does it match your description?), artifacts (distortions, weird elements), and overall aesthetic quality.
- Write a one-paragraph summary describing when you would use schnell vs dev in a production application. Consider a scenario where you are generating 1,000 images per day.