Prompt Engineering
Move from ad-hoc prompting to a systematic, tested approach that produces consistent results.
What you'll learn
From Ad-Hoc to Systematic

Why intuitive prompting fails at scale
Most developers start by typing natural language prompts and adjusting them by feel until the output looks right. This works for a single query. It fails when you need consistent results across thousands of API calls, diverse inputs, and edge cases you have not yet imagined.
Systematic prompt engineering replaces intuition with technique. Each of the five methods in this module addresses a specific failure mode, and knowing when to apply each one is what separates a production-grade AI feature from a demo.
The five techniques and when each applies
Technique      | When to Use                          | Token Cost | Typical Gain
Zero-shot      | Simple, well-defined tasks            | Lowest     | Baseline
Few-shot       | Tasks with specific patterns/formats  | Medium     | +15-30% accuracy
Chain-of-Thought| Multi-step reasoning problems        | Higher     | +20-40% on math/logic
Role Prompting | Tone, expertise, constraint needs      | Low        | Better consistency
XML Tags       | Complex structure, Claude-specific     | Low        | Better parsing reliability
Prompting is the fastest path to value
Before you build a RAG pipeline, before you consider fine-tuning, try a well-crafted prompt. In Module 3, you learned the decision framework: start with prompting, add RAG when you need external knowledge, fine-tune when you need to change behavior. This module gives you the tools to make prompting as powerful as possible before reaching for heavier solutions.
Technique 1 — Zero-Shot Prompting
Give the task with no examples
Zero-shot prompting means giving the model a task description without any examples of the expected output. This is your baseline — the simplest possible prompt.
import Anthropic from "@anthropic-ai/sdk";

const client = new Anthropic();

const response = await client.messages.create({
  model: "claude-sonnet-4-6",
  max_tokens: 64,
  messages: [{
    role: "user",
    content: `Classify this support ticket as billing, technical, or account:
"I can't log in to my dashboard"`
  }],
});
// Output: "technical"
When zero-shot works
Zero-shot is sufficient for simple, well-defined tasks where the expected output is unambiguous: basic classification, simple extraction, straightforward summarization. If the task has a clear right answer and the model's training data covers the domain, zero-shot often works well.
When zero-shot fails
Zero-shot fails on ambiguous tasks, edge cases, and tasks requiring specific output formats. Consider: is "I was charged twice and now I can't access my account" a billing issue or a technical issue? Without examples showing how you want edge cases handled, the model guesses — and its guess may not match your business logic.
Technique 2 — Few-Shot Prompting
Show 3–5 examples including edge cases
Few-shot prompting adds examples of the expected input-output mapping. This is often the single biggest improvement you can make to a prompt.
const system = `Classify support tickets into exactly one category.

Examples:
Ticket: "Credit card charged twice" -> billing
Ticket: "Export button gives 500 error" -> technical
Ticket: "Change my email address" -> account
Ticket: "Charged for wrong plan tier" -> billing
Ticket: "Can't reset password, error page" -> technical`;

const response = await client.messages.create({
  model: "claude-sonnet-4-6",
  max_tokens: 64,
  system,
  messages: [{
    role: "user",
    content: `Ticket: "Charged twice and now locked out of my account"`
  }],
});
// Output: "billing" (follows the pattern of prioritizing the charge issue)
Why example quality matters more than quantity
3–5 well-chosen examples outperform 20 mediocre ones. The key is to include examples that cover edge cases and ambiguity — the cases where the model would otherwise guess wrong. If all your examples are easy, the model learns nothing from them.
Start with zero-shot. Add examples only when you see consistent failures on specific patterns. Each example costs tokens, so add them surgically to address the failure modes you actually observe, not speculatively.
Few-shot vs fine-tuning for behavior change
Few-shot prompting and fine-tuning both change the model's behavior, but they work differently. Few-shot provides temporary context that guides the model for a single conversation. Fine-tuning permanently modifies model weights. The tradeoffs:
- Few-shot: No training cost, instant iteration, examples consume context window tokens, works for most behavior changes.
- Fine-tuning: Upfront training cost ($100–$10K), cannot iterate quickly, saves context window space, needed only for deep behavioral changes (distinctive voice, domain-specific patterns).
For 90%+ of use cases, few-shot prompting is the right choice. Fine-tune only when you need a behavior change so deep that examples cannot capture it.
Technique 3 — Chain-of-Thought
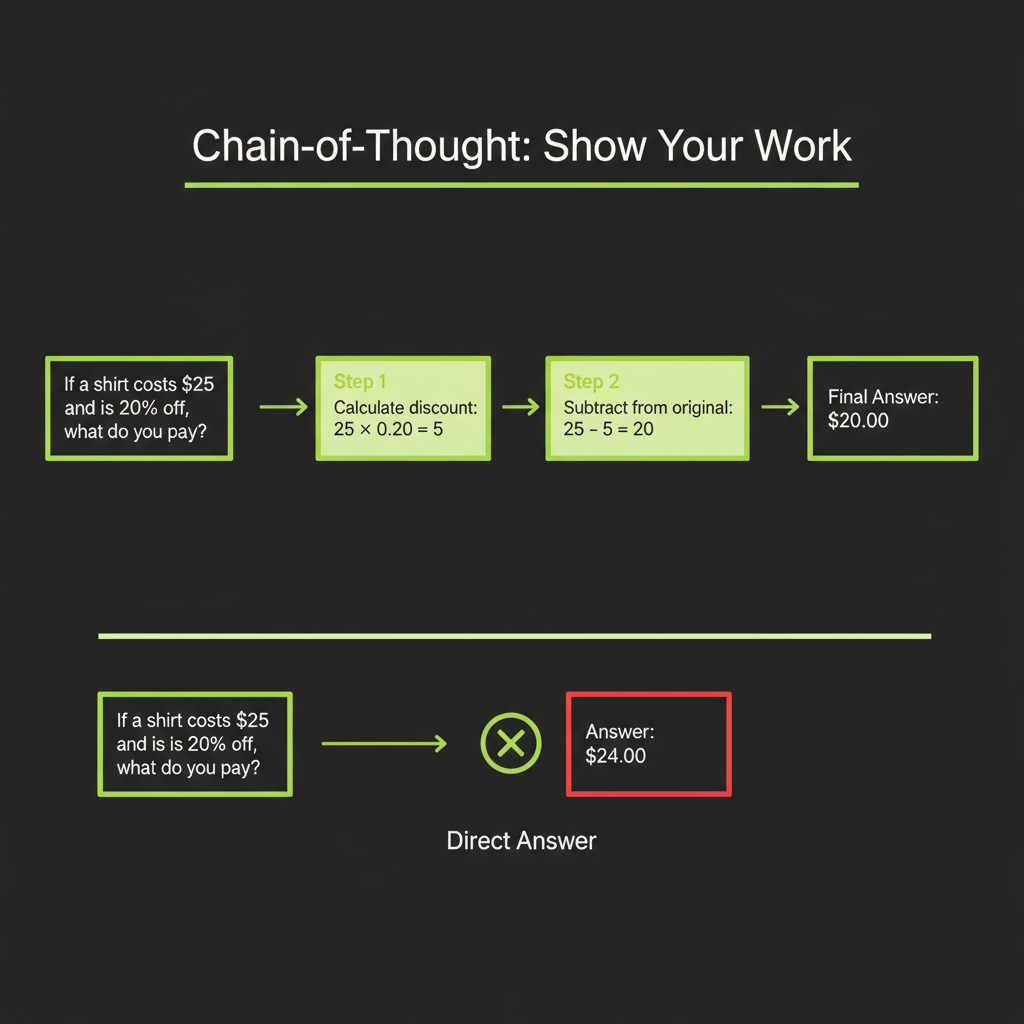
Ask the model to reason step-by-step
Chain-of-Thought (CoT) prompting asks the model to show its reasoning before providing an answer. This dramatically improves performance on multi-step problems — math, logic, complex analysis — because the model's intermediate reasoning tokens feed back into its own context.
// Without CoT — model jumps to answer, often wrong on complex problems
const noCoT = "A customer ordered 3 items at $29.99 each with a 15% discount and $8.50 shipping. What's the total?";
// Model might output: "$84.97" (sometimes wrong)

// With CoT — model shows work, much more reliable
const withCoT = `A customer ordered 3 items at $29.99 each with a 15% discount and $8.50 shipping.
Think step by step, then provide the total.`;
// Model outputs:
// 1. Subtotal: 3 x $29.99 = $89.97
// 2. Discount: $89.97 x 0.15 = $13.50
// 3. After discount: $89.97 - $13.50 = $76.47
// 4. With shipping: $76.47 + $8.50 = $84.97
// Total: $84.97
Zero-shot CoT vs few-shot CoT
Zero-shot CoT simply adds "Think step by step" to the prompt. This is surprisingly effective — a single phrase can improve accuracy by 20–40% on reasoning tasks.
Few-shot CoT provides example reasoning chains, showing the model how to think, not just that it should think. This is even more effective but costs more tokens.
When CoT is worth the extra tokens
CoT generates more output tokens (the reasoning steps), which increases cost. Use it when:
- The task involves multi-step reasoning (math, logic, analysis)
- The task requires weighing multiple factors (classification with ambiguity)
- Accuracy matters more than speed or cost
Do not use CoT for simple tasks like basic classification or extraction — it adds cost without improving quality.
Technique 4 — Role Prompting
Set persona and constraints via system prompt
Role prompting defines who the model is for this conversation. This shapes tone, vocabulary, depth of expertise, and what the model will and will not do.
const system = `You are a senior customer support agent for Acme Corp.
You have 10 years of experience with our product line.
You are empathetic but efficient — acknowledge the customer's frustration,
then provide a clear, actionable solution.
You always cite the relevant policy section in your answer.
You never speculate about product features you are unsure of.`;
const response = await client.messages.create({
model: "claude-sonnet-4-6",
max_tokens: 512,
system,
messages: [{ role: "user", content: "I was charged twice for my subscription!" }],
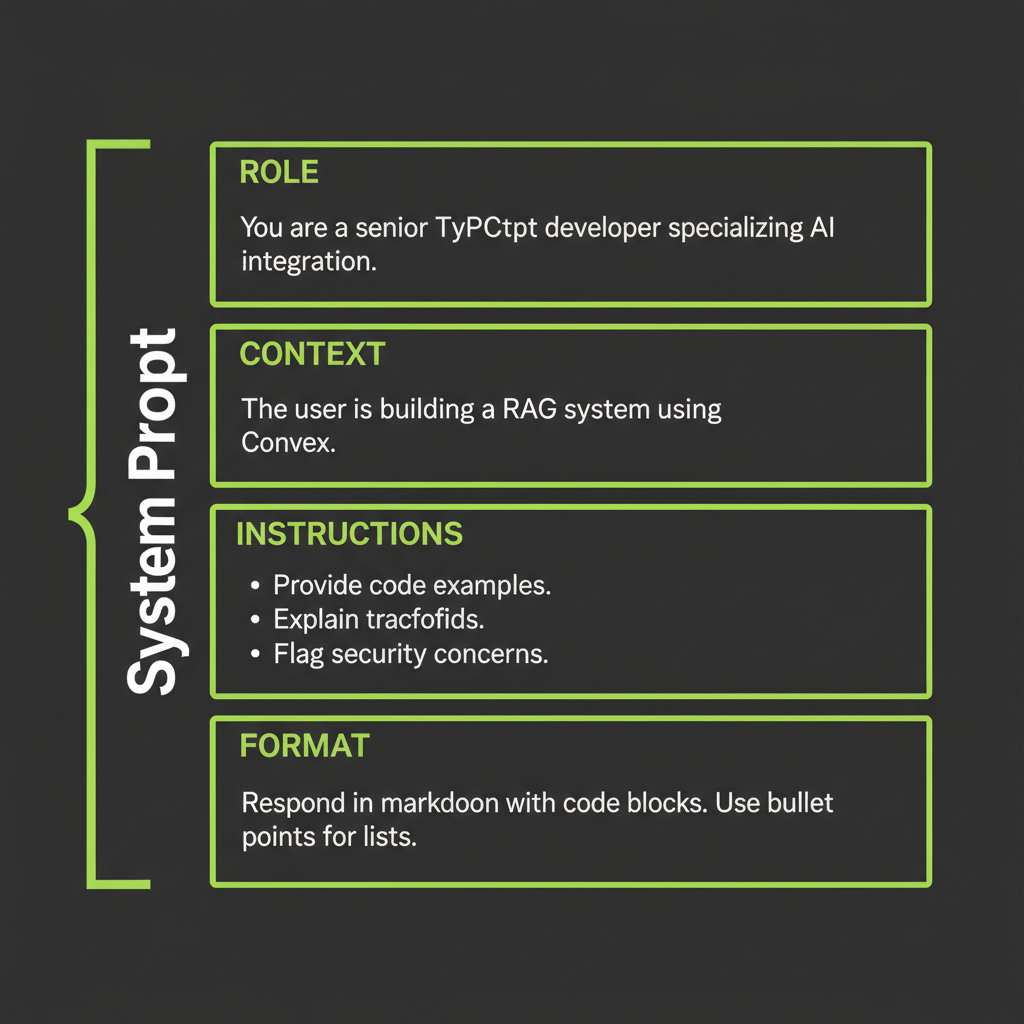
});System prompt anatomy: role + context + instructions + format
The most effective system prompts follow a four-section structure:
- Role: Who the model is and what expertise it has.
- Context: What the model knows about the situation (business rules, constraints).
- Instructions: What the model should and should not do.
- Format: How the output should be structured.
Be specific about what the role can and cannot do. "You are a helpful assistant" is too vague to be useful. "You are a billing support agent who can process refunds but cannot modify account permissions" gives the model clear boundaries that prevent hallucinated capabilities.
Technique 5 — XML Tags for Claude
Why Claude responds better to structured XML
Claude is specifically trained to understand XML-tagged structure. Tags create unambiguous boundaries between different parts of your prompt — instructions versus data, context versus rules, input versus expected output. This prevents the model from confusing your instructions with the content it should process.
const system = `You are a support agent. Answer questions using ONLY
the provided context.

<rules>
- If the context does not contain the answer, say "I don't have
  information about that."
- Quote the relevant section when possible.
- Keep answers under 3 sentences.
</rules>

<context>
${retrievedChunks.join("\n\n")}
</context>`;
Key tags for Claude
<context>— Retrieved documents, background information<instructions>— What the model should do<rules>— Constraints and boundaries<examples>— Few-shot examples<format>— Expected output structure<thinking>— Space for chain-of-thought reasoning
Using tags for structured output extraction
XML tags are especially powerful for extracting structured data. You can ask Claude to wrap its output in tags that you parse programmatically:
const response = await client.messages.create({
  model: "claude-sonnet-4-6",
  max_tokens: 512,
  messages: [{
    role: "user",
    content: `Extract the key information from this support ticket:
"Hi, I'm Jane Smith (jane@example.com). I was charged $49.99 on March 15
but I cancelled my subscription on March 10. Order #12345."

Respond using these tags:
<customer_name>...</customer_name>
<email>...</email>
<issue_type>billing | technical | account</issue_type>
<amount>...</amount>
<order_id>...</order_id>
<summary>One sentence summary</summary>`
  }],
});

// Parse the XML tags from the response
const text = response.content[0].type === "text" ? response.content[0].text : "";
const name = text.match(/<customer_name>(.+?)<\/customer_name>/)?.[1];
const email = text.match(/<email>(.+?)<\/email>/)?.[1];
const issueType = text.match(/<issue_type>(.+?)<\/issue_type>/)?.[1];
Wrapping retrieved context in tags (connects to Module 4)
In Module 4, you built a RAG system that injects retrieved chunks into the prompt. XML tags make this injection more reliable by clearly separating the instructions from the retrieved context. This prevents prompt injection — the model knows what is instruction versus data because the boundaries are explicit.
Putting It Together — Prompt Design Workflow
Follow this sequence for every production prompt: (1) Write the baseline zero-shot prompt. (2) Test with 5 representative inputs. (3) Identify failure modes. (4) Add examples or CoT where failures cluster. (5) Wrap in XML structure. (6) Measure again. This iterative approach converges on quality faster than trying to write the perfect prompt on the first attempt.
Step-by-step workflow
- Write the baseline zero-shot prompt. Keep it simple. Describe the task clearly.
- Test with 5 representative inputs. Include at least one edge case and one adversarial input.
- Identify failure modes. Where does the model get it wrong? Does it misclassify edge cases? Produce the wrong format? Hallucinate?
- Add targeted improvements. If edge cases fail, add few-shot examples covering those cases. If reasoning is wrong, add CoT. If format is inconsistent, add XML output tags.
- Wrap in XML structure. Separate context, instructions, examples, and format into tagged sections.
- Measure again. Run the improved prompt against a larger test set (20–50 inputs). Compare accuracy before and after.
// The workflow in code
async function developPrompt(task: string, testInputs: string[]) {
  // Step 1: Baseline
  let systemPrompt = `${task}`;
  let results = await runTests(systemPrompt, testInputs);
  console.log("Baseline accuracy:", results.accuracy);

  // Step 3: Identify failures
  const failures = results.cases.filter((c) => !c.correct);
  console.log("Failure patterns:", failures.map((f) => f.input));

  // Step 4: Add few-shot examples targeting failures
  systemPrompt = `${task}

<examples>
${failures.map((f) => `Input: "${f.input}" -> ${f.expectedOutput}`).join("\n")}
</examples>`;

  // Step 6: Re-measure
  results = await runTests(systemPrompt, testInputs);
  console.log("After examples:", results.accuracy);
}Run a support ticket classification task using three different techniques and compare their accuracy.
- Define 10 test tickets covering billing, technical, and account categories. Include 3 edge cases that could belong to multiple categories.
- Run zero-shot: Use a simple "Classify as billing, technical, or account" prompt. Record accuracy.
- Run few-shot: Add 5 examples (including 2 edge cases). Record accuracy. Note which previously-failed cases now succeed.
- Run CoT: Add "Think step by step about which category best fits before answering." Record accuracy.
- Compare: Which technique handles edge cases best? Which is most token-efficient? Write down which technique you would use in production and why.