Tool Calling
Build tools Claude can use — master the API pattern that powers every agentic system.
What you'll learn
The Tool Calling API Pattern
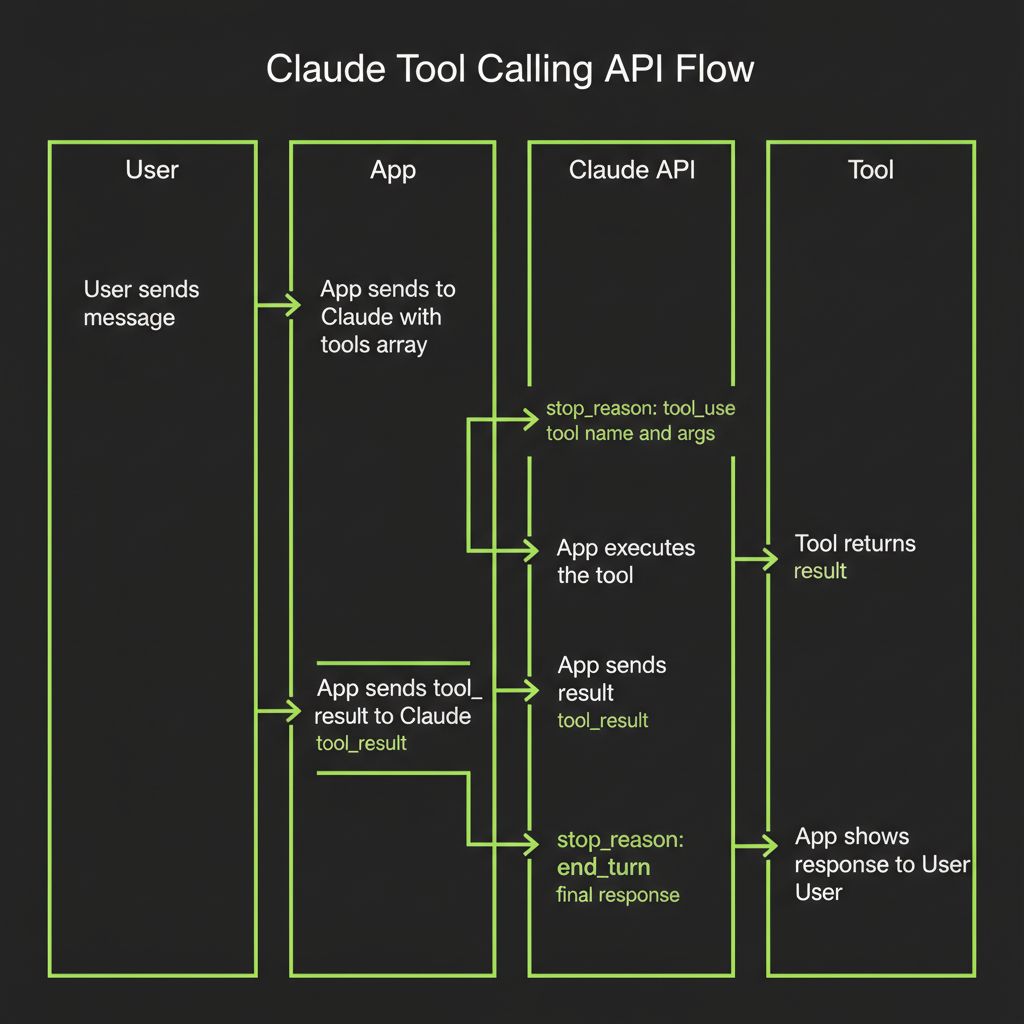
Tool calling is the mechanism that turns a language model into an agent capable of taking real-world actions. In Module 6, you learned the conceptual agentic loop. Now you will implement it with real API calls. The pattern is the same across every agentic framework — understanding it at the API level means you can debug any agent, regardless of what framework wraps it.
Define tools with name, description, and JSON schema for parameters
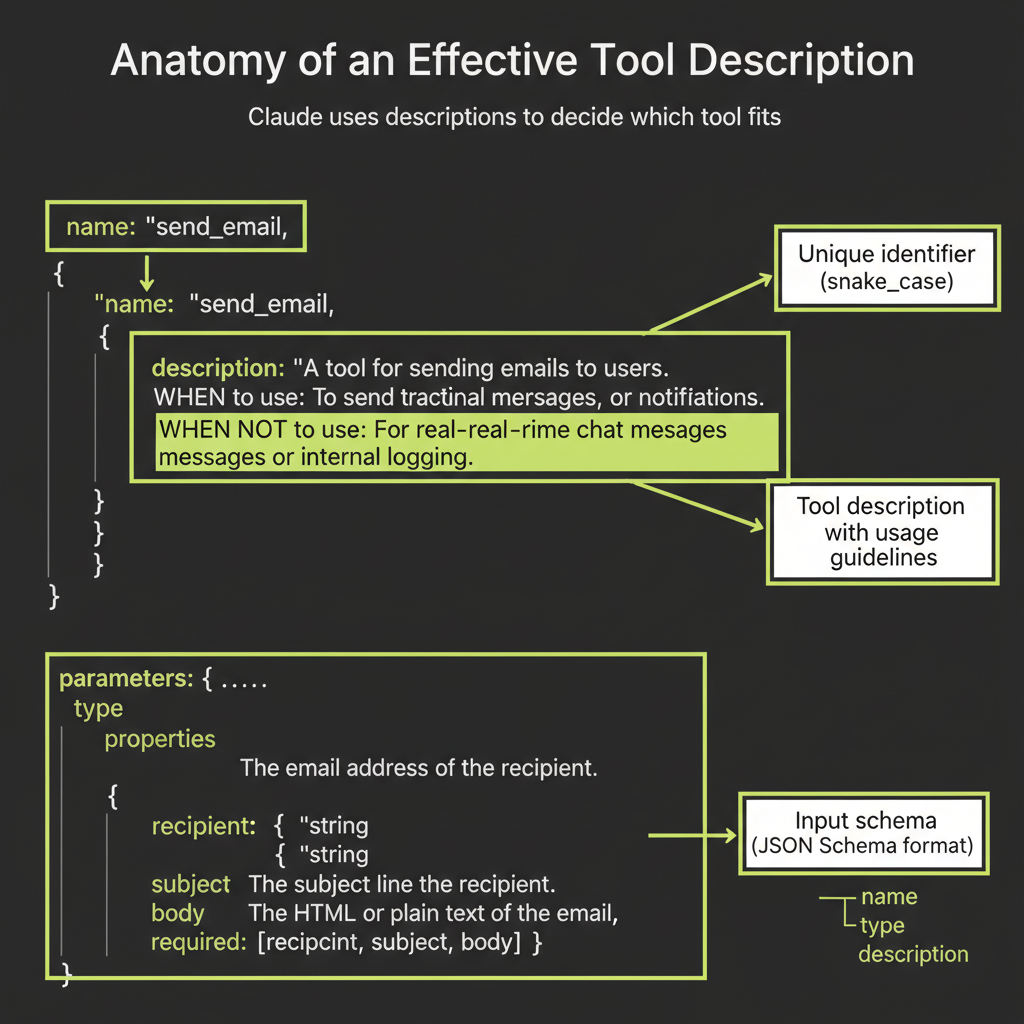
A tool definition has three parts: a name (snake_case, verb-noun pattern), a description (Claude reads this to decide when to use the tool), and an input_schema (JSON Schema describing the parameters the tool accepts).
import Anthropic from "@anthropic-ai/sdk";

const client = new Anthropic();

const tools = [
  {
    name: "get_weather",
    description:
      "Get the current weather for a given city. Use this when the user asks about weather conditions, temperature, or forecasts.",
    input_schema: {
      type: "object",
      properties: {
        city: {
          type: "string",
          description: "The city name, e.g. 'San Francisco'",
        },
      },
      required: ["city"],
    },
  },
];
Send message to Claude with tools array
You include the tools array in your API call alongside the messages. Claude sees both the user's message and the available tools, then decides whether calling a tool would help answer the question.
const response = await client.messages.create({
  model: "claude-sonnet-4-6",
  max_tokens: 1024,
  tools,
  messages: [
    { role: "user", content: "What's the weather in Tokyo?" },
  ],
});
stop_reason: tool_use — Claude wants to call a tool
When Claude decides to call a tool, the response's stop_reason is "tool_use" instead of "end_turn". This is your signal: Claude is not done yet. It needs you to execute a tool and return the result.
{
  "content": [
    {
      "type": "tool_use",
      "id": "toolu_01abc123",
      "name": "get_weather",
      "input": { "city": "Tokyo" }
    }
  ],
  "stop_reason": "tool_use"
}
tool_use content block: name + arguments (structured JSON)
The tool_use block contains everything you need: the tool name (matching your definition), a unique id (to correlate the result with the request), and input (the arguments Claude generated based on your schema). These arguments are structured JSON — not free text — which makes them reliable to parse and pass to your tool function.
Execute the tool and collect the result
This is your code's job. Look up the tool by name in your registry, pass the arguments to the appropriate function, and capture the output. This could be anything: a database query, an HTTP request, a file read, a calculation. The model does not execute the tool — your application does.
Send tool_result content block back to Claude
Package the tool's output as a tool_result content block and send it back in the next message. Reference the original tool_use_id so Claude knows which tool call this result answers.
const followUp = await client.messages.create({
  model: "claude-sonnet-4-6",
  max_tokens: 1024,
  tools,
  messages: [
    { role: "user", content: "What's the weather in Tokyo?" },
    { role: "assistant", content: response.content },
    {
      role: "user",
      content: [
        {
          type: "tool_result",
          tool_use_id: "toolu_01abc123",
          content: JSON.stringify({
            temperature: 22,
            condition: "partly cloudy",
            humidity: 65,
          }),
        },
      ],
    },
  ],
});
Claude now has the weather data and responds naturally: "The weather in Tokyo is 22 degrees C and partly cloudy with 65% humidity."
stop_reason: end_turn — Claude is done with tools
After receiving tool results, Claude either calls another tool (if it needs more information) or responds with final text. When stop_reason is "end_turn", the loop terminates.
Loop implementation pattern
In production, wrap the entire flow in a loop:
let messages = [{ role: "user", content: userInput }];

while (true) {
  const response = await client.messages.create({
    model: "claude-sonnet-4-6",
    max_tokens: 1024,
    tools,
    messages,
  });

  messages.push({ role: "assistant", content: response.content });

  if (response.stop_reason === "end_turn") {
    break; // Claude is done
  }

  const toolResults = [];
  for (const block of response.content) {
    if (block.type === "tool_use") {
      const result = await executeTool(block.name, block.input);
      toolResults.push({
        type: "tool_result",
        tool_use_id: block.id,
        content: JSON.stringify(result),
      });
    }
  }

  messages.push({ role: "user", content: toolResults });
}
Writing Tool Descriptions That Work
The most underrated skill in agentic development
Tool descriptions are the prompts of the agent world. Claude uses descriptions to decide which tool to call and when. A vague description means Claude guesses. A precise description means Claude chooses correctly. This is not a minor detail — description quality is the single biggest lever for improving agent reliability.
Tool description quality matters enormously. Claude uses descriptions to decide which tool fits — not just that a tool exists. Invest the same care in tool descriptions as you invest in system prompts.
Specify WHEN to use the tool
Every tool description should include explicit conditions for when the tool is appropriate. Use the phrase "Use this when..." to make the conditions unambiguous:
{
  name: "search_web",
  description:
    "Search the web for current information. Use this when the user asks about recent events, facts you're unsure about, or anything that requires up-to-date data. Returns a list of results with titles, URLs, and snippets.",
}
Specify WHEN NOT to use the tool
Negative guidance is equally important. Tell Claude what the tool is not for. This prevents the model from reaching for the wrong tool when a user request partially matches:
{
  name: "search_web",
  description:
    "Search the web for current information. Use this when the user asks about recent events or facts you're unsure about. Do NOT use this for math calculations (use the calculator tool) or for questions about the user's own documents (use search_notes).",
}
Parameter descriptions: name each parameter and explain what it expects
Every parameter should have a description explaining the expected format, valid ranges, and examples:
properties: {
  query: {
    type: "string",
    description:
      "The search query. Be specific and include key terms. Example: 'Claude API tool calling TypeScript' rather than just 'API tools'.",
  },
  max_results: {
    type: "number",
    description: "Maximum number of results. Default: 5. Range: 1-20.",
  },
}
JSON schema types and constraints
Use JSON Schema constraints to prevent invalid inputs at the schema level: required for mandatory fields, enum for fixed option sets, minimum/maximum for numeric ranges, and pattern for string format validation. Tighter schemas mean fewer bad tool calls.
Building Convex Tools with createTool()
createTool() signature: name, description, parameters (Zod), execute function
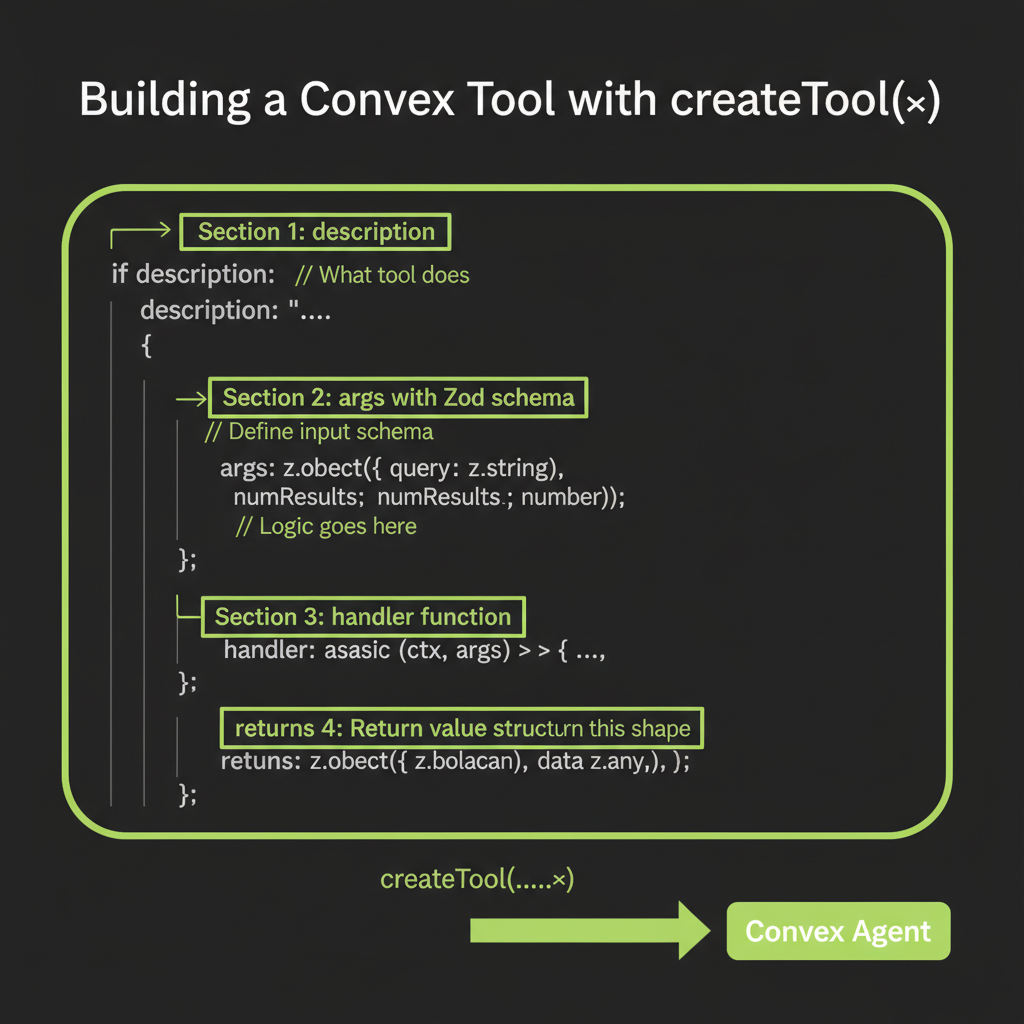
The createTool() function from @convex-dev/agent wraps tool definitions into a format that plugs directly into the agent component. Instead of raw JSON Schema, you write Zod schemas for type-safe parameter validation. Instead of managing the loop yourself, the agent component handles tool execution, result serialization, and message management.
import { createTool } from "@convex-dev/agent";
import { z } from "zod/v3"; // Note: zod/v3 for Convex compatibility

export const searchNotes = createTool({
  description:
    "Search the user's saved notes by keyword. Use this when the user asks about something they've previously saved.",
  args: z.object({
    query: z.string().describe("The search keyword or phrase"),
  }),
  handler: async (ctx, args) => {
    const results = await ctx.runQuery(internal.notes.search, {
      query: args.query,
    });
    return JSON.stringify(
      results.map((note) => ({
        title: note.title,
        content: note.content,
        createdAt: note._creationTime,
      }))
    );
  },
});
The execute function receives (ctx, args) — ctx gives Convex context
The handler's first argument is a Convex action context (ctx), giving you full access to ctx.runQuery(), ctx.runMutation(), and ctx.runAction(). This means your tools can read from the database, write to it, call external APIs, or invoke other Convex functions. The second argument (args) contains the validated parameters.
Defining parameters with Zod: z.object(), z.string(), z.number(), optional fields
Zod schemas are converted to JSON Schema automatically by the agent component. Use .describe() on each field — these descriptions become the parameter descriptions Claude sees:
args: z.object({
  query: z.string().describe("Search query -- be specific"),
  maxResults: z
    .number()
    .min(1)
    .max(20)
    .optional()
    .describe("Maximum results to return. Default: 5."),
  category: z
    .enum(["article", "note", "bookmark"])
    .optional()
    .describe("Filter by content type"),
})
Returning structured results vs plain strings
Tool handlers must return strings. For structured data, use JSON.stringify(). The key principle: return data that Claude can interpret without ambiguity. Use clear field names, include relevant context, and truncate large results to prevent context window overflow.
Connecting tools to the Agent instance
import { Agent } from "@convex-dev/agent";
import { components } from "./_generated/api";
import { anthropic } from "@ai-sdk/anthropic";
import { webSearch, readUrl, calculator } from "./tools";

export const webAgent = new Agent(components.agent, {
  name: "Ask-the-Web",
  languageModel: anthropic("claude-sonnet-4-6"),
  instructions: `You are a research assistant that can search the web,
read web pages, and perform calculations.`,
  tools: { webSearch, readUrl, calculator },
  maxSteps: 5, // Default is 1 -- tools won't loop without this
});
Note that tools is an object, not an array. The keys become the tool names Claude sees. And maxSteps is critical: the default is 1, meaning the agent calls one tool then responds. For multi-step research, set it higher.
Testing Tools in Isolation
Why testing each tool independently matters
When an agent produces bad output, four things could be wrong: the tool definition, the tool execution, the system prompt, or Claude's decision-making. If you test everything together, you cannot isolate the cause. Testing each tool independently eliminates half the variables before you involve the model at all.
Build one tool. Test one tool. Then connect to the agent. Never debug tools and agent behavior simultaneously. This single practice will save you more time than any framework feature.
Unit test pattern: call the execute function directly with known inputs
Call the handler directly with mock context and known arguments. Verify that valid inputs produce correct outputs and invalid inputs produce graceful errors:
// Test valid input
const result = await calculator.handler(mockCtx, {
  expression: "(4 * 12) + 7",
});
console.assert(result === "55", `Expected "55", got "${result}"`);

// Test invalid input
const errorResult = await calculator.handler(mockCtx, {
  expression: "not a math expression",
});
console.assert(
  errorResult.includes("Error"),
  "Should return error for invalid input"
);

// Test edge case
const edgeResult = await calculator.handler(mockCtx, {
  expression: "1 / 0",
});
console.log("Division by zero result:", edgeResult);
Verify output schema before connecting to agent
Before adding a tool to an agent, run 5–10 realistic inputs and inspect the raw output. Is it structured JSON? Are field names clear? Is the output a reasonable size? Fix issues at the tool level before the model enters the picture.
Error Handling in Tool Calls
Tool execution failures: what to return in tool_result
Tools fail. APIs time out, services return errors, inputs are malformed. When a tool fails, return a structured error message that Claude can understand and act on — not a stack trace, not an exception, not an empty string:
handler: async (ctx, args) => {
  try {
    const response = await fetch(
      `https://api.example.com/data?q=${args.query}`
    );
    if (!response.ok) {
      return JSON.stringify({
        error: true,
        message: `API returned ${response.status}: ${response.statusText}`,
        suggestion: "Try a different query or check service availability.",
      });
    }
    return JSON.stringify(await response.json());
  } catch (error) {
    return JSON.stringify({
      error: true,
      message: `Request failed: ${error.message}`,
      suggestion: "The service may be temporarily unavailable.",
    });
  }
}
Graceful degradation: structured error messages Claude can understand
The suggestion field is key. It tells Claude what to do about the error: try different parameters, use a different tool, or inform the user. Without guidance, Claude may retry the same failing call or hallucinate an answer instead of acknowledging the failure.
Always implement timeout handling for external API calls. A tool that hangs blocks the entire agent loop. Use AbortController with a 5–10 second timeout. For rate-limited APIs, implement exponential backoff starting at 1 second and doubling on each retry, up to 3 retries max.
Timeout handling for slow external APIs
const controller = new AbortController();
const timeout = setTimeout(() => controller.abort(), 10000);

try {
  const response = await fetch(url, { signal: controller.signal });
  clearTimeout(timeout);
  return JSON.stringify(await response.json());
} catch (error) {
  clearTimeout(timeout);
  if (error.name === "AbortError") {
    return JSON.stringify({
      error: true,
      message: "Request timed out after 10 seconds",
      suggestion: "Try again or simplify the query.",
    });
  }
  throw error;
}
Rate limiting: exponential backoff pattern
async function fetchWithRetry(
  url: string,
  maxRetries = 3
): Promise<Response> {
  let delay = 1000;
  for (let attempt = 0; attempt < maxRetries; attempt++) {
    const response = await fetch(url);
    if (response.status !== 429) return response;
    await new Promise((r) => setTimeout(r, delay));
    delay *= 2;
  }
  throw new Error("Rate limit exceeded after retries");
}
The ReACT Pattern
Reasoning + Acting: explicit thinking before tool calls
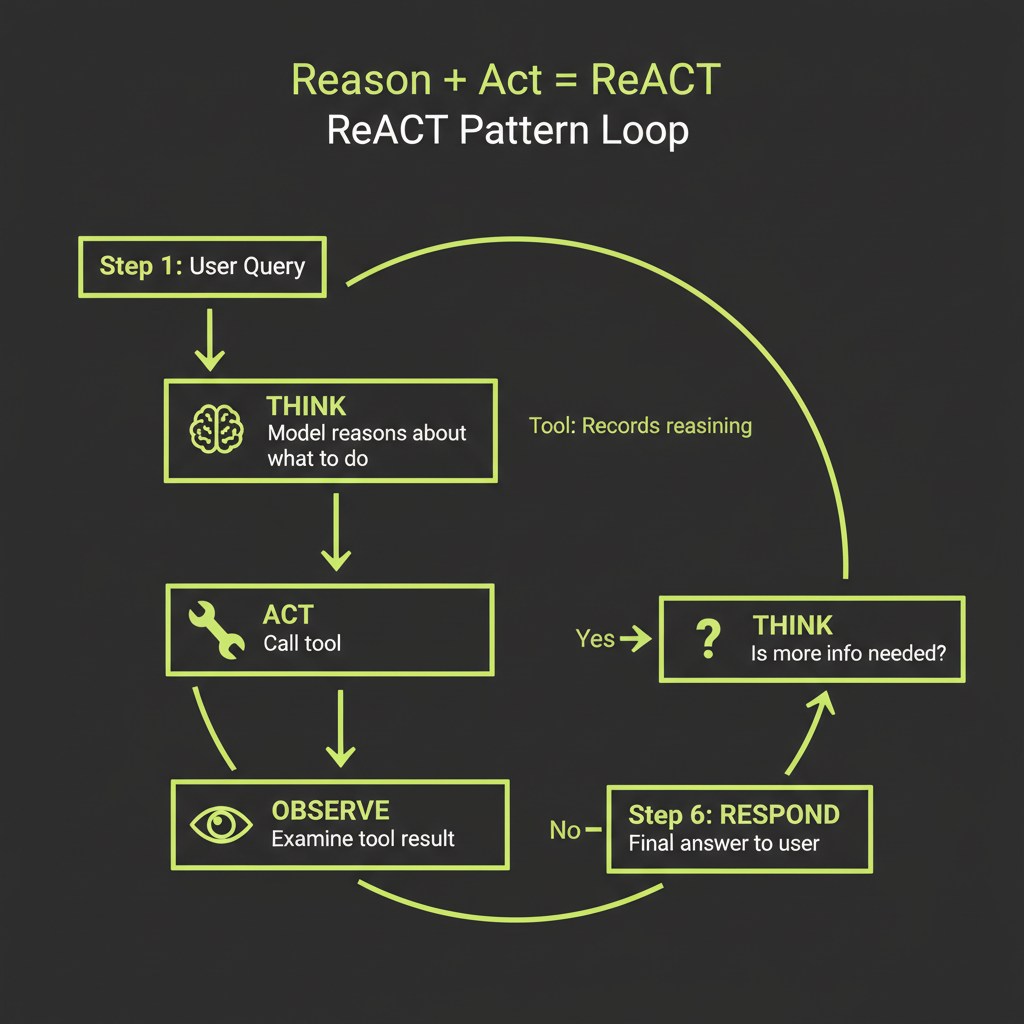
ReACT (Reasoning + Acting) adds explicit reasoning steps to the tool-use loop. Instead of jumping from user question to tool call, the model first articulates what it needs to find out, why it is choosing a particular tool, and what it expects to learn. This makes the agent's decision-making visible and debuggable.
User: What's the population density of the most populated country?

Think: I need to find the most populated country, then its area,
       then calculate density. Let me start with population data.

Action: search_web("most populated country 2025")
Observation: India has approximately 1.44 billion people...

Think: India is most populated. Now I need total area.

Action: search_web("India total area square kilometers")
Observation: 3,287,263 km2

Think: Now I can calculate: 1,440,000,000 / 3,287,263

Action: calculator("1440000000 / 3287263")
Observation: 438.0

Response: India is currently the most populated country with about
1.44 billion people and an area of 3,287,263 km2, giving a
population density of approximately 438 people per km2.
The "think" tool: a tool that does nothing but records reasoning
A practical way to implement ReACT is a dedicated think tool. It takes no external action — its value is in making the model's reasoning visible in the conversation history for debugging:
export const think = createTool({
  description:
    "Use this to think step-by-step before acting. Record your reasoning about what information you need, which tool to use next, and what you expect to find. This helps you make better decisions.",
  args: z.object({
    reasoning: z.string().describe("Your step-by-step reasoning"),
  }),
  handler: async (ctx, args) => {
    return "Reasoning recorded. Proceed with your next action.";
  },
});
Why visible reasoning improves tool selection accuracy
When the model reasons before acting, it decomposes the problem, identifies information gaps, and plans its approach. This is chain-of-thought prompting applied to tool selection. The result: fewer wrong tool calls, better parameter choices, and more efficient multi-step research chains. Claude already does this naturally to some degree — the think tool makes it explicit and inspectable.
Build Project — Single-Tool Isolation Exercise
Before building a full multi-tool agent, practice the tool development workflow with a single tool in isolation.
Build a calculator tool using createTool(), test it in isolation, then connect it to an agent.
- Define the tool — Create a
calculatortool withcreateTool(). Write a description specifying when to use it ("for math calculations, unit conversions") and when NOT to ("do not use for general knowledge questions"). - Write 5 test inputs — Include:
"2 + 2","(100 * 1.08) ^ 5","hello world","0 / 0", and"Math.sqrt(144)". - Test the handler directly — Call the handler with each test input. Verify correct results for valid expressions and graceful error messages for invalid ones.
- Connect to an agent — Add the calculator to an Agent instance. Test with three messages: "What is 15% of 340?" (should trigger), "What is the capital of France?" (should NOT trigger), and "How many seconds in a year?" (might trigger).
- Evaluate — Did Claude call the tool only when appropriate? If not, refine the description and re-test.